Showing posts with label digital photography. Show all posts

02 April 2021

Wy'east EXTREME CLOSEUP

3800

The camera I'm currently using, the Canon PowerShot SX230HS, is a replacement for my late, lamented PowerShot S100 which died suddenly and tragically young. It is not the same as that little charmer, and not necessarily better in all ways; I found the most capable camera in my price range that was as close to function and temporal manufacture as the S100 was. 

In some notable ways it actually exceeds the beloved S100, and that would be in optical zoom. Whereas the S100 had 5x optical zoom, the SX230HS has 14x optical zoom. When you throw in the digital zoom you get at the end of that range, how much magnification can you get?

How about 56x? No, I didn't mistype this. And it's flawless. In a somewhat-dated, point and shoot digital camera, it's a boon.

Here's a thing I did: when at the corner of 116th and NE Shaver, in the previous missive, taking pictures of our beloved mountain, I wanted to come up with a baseline idea. So I zoomed in, stayed steady and snapped. This is what I got of this modest camera:


I mean, if I got any closer, I'd be climbing the danged thing.

29 May 2020

The New-to-us New Camera

3681Well, we all go through transitions and one has come upon us here.

For many years now we've been lensing with a trusty little point-and-shoot job called the Canon PowerShot S100. That camera was a workhorse and never let me down ... until she did.

It's like this: The last several shots were gotten, then we stopped for reasons at the Fred Meyer Stadium store. I saw some likely snaps out the 2nd floor (I posted one taken from the crap camera of the very tablet I'm writing this on ... I have a DigiLand 1032, very low cost but punches well above its weight in just about every category of functionality except that one). What happened was the camera would power on, the lens barrel would extend and then the camera would report LENS ERROR, then power down. Many years of flawless service and then ... splat. That camera's lens barrels are now jammed out, and the camera is essentially useless now, unless we get it repaired.

Since the S100 came out in 2011, that's kind of a non-starter as well.

A good friend, Rick, bestowed upon me a camera he was no longer using; the Canon PowerShot A1200, a camera from slightly before that. Functions fine and takes great shots. Doesn't do as much but is a great bridge. We are grateful for Rick for the boon of this camera; it meant that I didn't have to cut my rate of picture-taking and, going foward, will make a fine adjunct to the range of amateur equipment we have access to.

Thank you again, Rick. A lifesaver you are.

I do still desire a camera that has functions and capabilities in the range of the S100. Calling the used tech places we love, we came up empty-handed here. However ...Stuff, that redoubtable electropawn store on SE 82nd at Otty, did have this little baby, which we have acquired:


Allow me to introduce the Canon PowerShot SX230 HS. This, as the S100 and the A1200, is a 12.1 MPx camera that supplies all the functionality that the S100 did, and  was released about 18 months before the S100 was. It doesn't do Camera Raw, but then, I never used that. One really beautiful thing about it is that it offers 14X optical zoom ... even the S100 only did 5X optical zoom. And that means something to me because I love playing with in-camera effects I can create with zoom. The more optical zoom the better ... digital zoom cuts down the image, but optical zoom gives you all the image at every level.

It also has that great intuitive Canon interface that I already know quite well. I hope to get an S100 (or its equivalent) back into the toolbox at one time. Until that time, though, this looks to have all the chops to become the workhorse I'll always have with me, as the S100 was.

And so it goes.

26 February 2016

[liff] Tele-faux-to Beauty

3275.
One more stop along the intersection of Foster and Holgate for now, then we move on.

I just have the one digital camera. It's a Canon PowerShot S100 provided by a most beneficent friend who has my f-stop number. It's a step up from the Kodak that we had before it, which is still good … but this's better. Fun effects, things to play with … better zooms than the old plastic fantastic, the ViviCam 3705, which still does home duty.

Every device has its place, and we don't throw things away because they get old. The old cameras are still doing just like they always did, though the 3705 seems to have developed a disease that has made it even more hungry for battteries, which is strange, because it's an inanimate object. Or … is it?

Point is, being limited with ones equipment makes one push the one they have to the utmost. With the power of the Canon's zoom and the various effects and a talent I seem to have for composition and finding interesting perspective lines, it wasn't long before I was exploring. I've done this before. I found out that if I chose the right sight line and framed and zoomed just so, the effect I got was much like I remember telephoto pictures, and since I'm faking it, I call it my own word: telefauxto. Pronounced the same. And I like the effects just the same.


First, looking down Foster Road, from the series of shots posted yesterday. The line of electrical poles have a rhythm, logic and meter of their own, and form a skeleton nailing down the landscape you can see behind it. And, partially shorn of context, make a poetry of its own.


When I look down a side street, zoom and crop just so, a different perspective imposes itself and becomes the star of the piece. This is saturated with a mood and presence that remind me of a great many Southeast Portland side streets.


This one doesn't use a high-angle perspective but it does go with a contextless approach to generate a sort of introspective mood of its own. Wires, poles, insulators, and transformers against a turbulent sky. The shapes defined by the colors, values, and straight lines can lead to other worlds, if the eyes linger long enough.


Reality is real, but reality is also what you put in, and what you leave out.

07 June 2014

[pdx] Telephoto Fun on Portland Streets With The Canon PowerShot S-100

3108.
Telephoto means one thing to me and, being an undisciplined amateur photographer, that's probably not accurate, but the result is an artful compression of distance.

SE 82nd Avenue looking south from SE Schiller Street
I've always adored telephoto shots because they draw a real interesting line between a kind of abstract expression and reality. It's like you're getting this fantasy world mixed with reality, 2-for-1.

SE Holgate Blvd looking west from about SE 105th Avenue

The way the posts and poles lining the street bunch up, the far comes near, forms fascinating shapes and defines entrancing spaces which capture the eye the way Celtic knotwork always does. Your POV goes exploring in interesting spaces that are both fantastic and real.

SE 122nd looking north from SE Morrison Street
The 'telephoto' shots taken by the Canon PowerShot S-100 aren't, strictly speaking, telephoto. Technically speaking, a telephoto lens uses a sequence of lenses called the telephoto group to create a light path that's longer than the physical length of the lenses. But you can come up with a pretty good simulation if you zoom in tight enough with the S-100, sort of what cinematographers would call an in-camera special effect. In its largest format, too, it combines the astoundingly-good optical zoom with a few levels of  digital zoom to get a zoom level of up to 20X. After that, it's a matter of framing and composing, or even cropping, to frame the viewpoint.

I'm finding the paltry knowledge I have about composition is actually going a long, long way. Some sense of composition is becoming key to composing good shots - or, at least, shots I like. The generous viewing screens of modern digital cameras are, of course a big boon, try WYSIWYG.

The levels of digital zoom seem to suffer some acceptable degradation of quality, which is to be expected. As I learnt with the old ViviCam 3705, the faithful Plastic Fantastic, digital zoom is a matter of taking the inside of the photo, blowing it up, and cropping. You get zoom, but the quality can be very bad. On the Canon S-100, though, it's good. I tried a very ad-hoc experiment; the above picture of 122nd is shot at maximum optical zoom and cropped. Left there is the same general view shot with maximum optical and digital zoom. The quality is good enough, to my tyro eye, to use as an effective illustration.

The view southbound down SE 122nd Avenue from the safety island by the Midland Library is maybe a little less expansive but the far away massif of Mount Scott, the layers of traffic signals, the shimmering warmth radiating up from the street and the bunched-up light poles ranging away in to the distance make up for what it lacks, compared to the former shot.

I do like this camera, I do.

SE 122nd Avenue looking south from near
the Midland Branch Library (just south of Morrison Street)

27 April 2014

[art] My Photos Get Around, Tom Peterson Edition

3073.
Casting ones art upon the waters is a dicey (as in, 'throw of the') proposition.

One hopes that the exposure gets one the good kind of notoriety, perhaps the notice that encourages people to support you, either with money or, at the very least, encouragement. And, just like the roll of the notional dice, it's a random thing.

Latterly, I've found this photo:


… the Tom Peterson's that was, out in the wild. Two places.

First, and most flattering, is this:


Which is in the Tom Peterson's Facebook channel and refers to a BuzzFeed listicle here: http://www.buzzfeed.com/portlandia/16-surefire-signs-you-grew-up-in-portland.

It illustrates point number nine:

It's not only flattering that someone thought my photo was nifty enough to illustrate, but that it did the job it was supposed to do. Also, being chosen to illustrate a Buzzfeed listicle, I think, equals achievement unlocked in some way. So what if I'm an amateur? Every photo I take, I think composition. Every one. If there was any artistic technique anyone should learn before doing any sort of art, it's composition. Randomness isn't a sin, mind … but if you're making any sort of visual impact, you're not only taking a picture, you're orchestrating a scene.

Take pictures that way and even your snapshots become memorable.

Another place I found is a blog entry. Disappointingly, I was not credited. Now, I know by putting the photo out on the intarwebz, I take this risk; depending upon the kindness of strangers. Fools' errand these days, to be sure, but if we don't share, we wind up having a very dull world. In September, 2012, a blog called Noticing SW Portland, which is fortunate to have been linked to by OregonLive according to the About section, commented on getting free tomatoes from a friend with the post Tom and Tomatoes, in as much as free IS a very good price, an idea I am pretty much down with. The illustration to evoke Tom?


Yepper. That's mine. Renamed, too.

For what it's worth, I'm not going to run this woman down and hassle her about it; I did post it to Flickr with a CC-BY-SA license, meaning anyone can have it, remix it even for commercial purposes, as long as they credited me for it. Because of this, I've changed the licensing to CC-BY-ND-SA, reducing the rights I'm releasing … no more commercial re-use, and no more redistribution if you remix it.

Now, I'm aware of the legal status of the CC licenses. I use them as a notice; it's easier to affix a Creative Commons license with my approximate desires than it is to endlessly tell people how I feel about it. CC isn't hard to parse and its something everyone should be aware of.

So, by posting to Flickr and affixing the CC-BY-SA, I made my intentions clear. Buzzfeed recognized that; a local blogger did not.

If she does happen by this post, though, I do ask one thing; just credit the photo, and we're square.

Even though I may be seen as an amateur by the world, my photos are not free for the taking. They might be free for the asking. At least you can ask. Terms can always be negotiable. 

23 February 2014

[photo] Adobe's DNG Converter … When Your Camera Raw is Too Uncooked

3027.
A few pictures in the last missive needed some additional, can you believe it, preprocessing before I could load them into Photoshop, something that took me by surprise.

It's the magic of competing formats. You have a lot of formats out there, not all are created equal, and everyone has their own way of doing things. The upside of this is that you have a lot of innovation. The downside is that your application might not be able to read the photo you took.

The Canon PowerShot 100S takes pictures almost too many ways to count. If you like setting your own options, the camera will, rather than .JPG, generate what's called a .CR2 file, which I take to be Canon's native Camera Raw format. I try to read this into Adobe Photoshop CS4 for my usual sizing before posting them to the blog … and though CS4 has recognized Camera Raw in the past, this one, it doesn't. I understand CS6 does, but that's not on the agenda yet and may not be, our shoestring being what it is, and I'm not in the class that can support the Creative Cloud (and I'm not that awestruck by the concept).

So, what to do? Seems a shame to waste those image files.

As it happens, there's an evolving universal standard, the .DNG file, or 'Digital Negative'. It's a standardization of Camera Raw, apparently, that CS4 can read.

And, thankfully, Adobe … the company that is good at standards, anyway, (thank you PDF) has a handy-dandy program that will convert your .CR2 files to .DNG, which Photoshop CS4 likes just fine.

To download the Mac version, good for Mac OS X 10.6-current (thankfully), go to this link:

http://www.adobe.com/support/downloads/detail.jsp?ftpID=5695&promoid=DTEHQ

It's about 145 MB and it's also free and works a treat on those files.

Yeah, it's just one more step. But, it works.

04 March 2012

[net_liff] The Girl Whose Feet Never Touch The Ground

2788Natsumi Hayashi is a young Japanese woman, who puts her super power on display for all the world to see.

Now, as far as polls go, attractive young women are right up there; Japanese moreso. The reason I make that tortured statement is to perhaps overmake the point that, while Natsumi Hayashi is very easy on the eyes generally, what will really make you fall in love with her is her delightfully skewed view, which she can make real and share with you:


She's pioneered what she calls levitation self-portraits, and there are quite a few. They make her seem in her environment, but not part of it. Something entirely un-Earthly and surreal and very wonderful to look at. They amuse the eye and lift the spirit.

She has many of these, whose secret is actually hard work; she sets her camera for auto-fire or has a friend squeeze the trigger, and really just jumps up and down. Out of the up-to-300-and-more photos taken on such a session, chances are, there'll be a few good ones.

It's reality, curated, really.

Her blog is Yowayowa Camera Woman Diary: http://yowayowacamera.com/. Come for the adorable young Japanese lady; stay for the sense of absurd wonder.

29 April 2008

[zk_news] Progressive Radio Host Sees PDX Clearly With Image From ZehnKatzen Design

1522.


Downtown Skyline photo joins others for rich scenic Stumptown tapestry


Portland, OR – The ZehnKatzen Times – 29 April 2008 – An agreement was reached today that grants The Russ Belville Show rights to use Samuel John Klein's downtown Portland skyline photo Portland Skyline From Marquam Bridge as an element in the design of his web page, http://radicalruss.com.


The photo, taken from the back seat of a car hurtling over Portland's Marquam Bridge, shows off one of the best views of downtown Portland, complete with Riverplace riverscape and a dramatic afternoon sky scattered with typically Oregon clouds but still having vast, beautiful areas of blue.


"Much of the civic beauty that is Portland can be seen in this photograph" states the photographer, Samuel John Klein, a Portland-based graphic designer, artist, and writer. "We keep hearing from acquaintances who see this view what a lovely city Portland is, and why it has the reputation it does. We, quite naturally, agree."


The photo can be seen if one surfs to the show's web page and looks on the left end of the rotating tag-line picture strip, just below the page header itself, where the image itself stands proudly aside other beautiful and famous images of Portland.


The Russ Belville Show is helmed by its namesake, who uses the nom de broadcast "Radical Russ", and broadcasts nationally via XM Satellite Radio channel 163 and locally to the Portland market from 8:00 AM to 10:00 AM Saturdays via Portland's Progressive Talk KPOJ AM 620, who has a fast, frequently funny, and always witty and lively view of progressive issues and the news of the day. It's also available via free podcast (you can also subrscribe to this via the iTunes store. We do.).


Tags: , , , , ,


-30-


Powered by Qumana

08 January 2008

[design]Photoshop's Curves Tool: The One Tool Everyone Should Know

1237. Just today, Empty Easel posted a nifty, quick-n-dirty tute on how to use the Photoshop Curves tool, and it got me to thinking about it – not so much because the Curves tool is so wicked useful, but because some of the designers I've talked to about it pretty much swear by it. It's the one tool that every PS user gets to know and love. EE's tutorial gives you a good look at why. My Designorati colleague Jeremy Schultz also had an opinionated point on it a year or so ago.


Curves in Photoshop is allows you control of output of every single pixel in the image file, but that in and of itself still isn't the amazing part ... it's the hands-on, graphical approach that makes it possible for every Photoshop user, from the n00b to the l33t, to become a master photo retoucher. With Curves any PS user can render, in a flash, how bright the brights are and how dark the darks are and define darks and brights on a completely catholic basis for the whole image file.


What I find myself using PS a lot for is to take digital photos and giving them a little darkening and brightening for the purpose of bringing out detail (it's ironic that reality frequently doesn't live up to its own promises).

The genius of the Curves function is, as I've intimated, in the interface design. It's just a graph with a curve – a straight line at this point, but mathematically speaking, even a straight line is a curve. In this example taken from Adobe Photoshop CS3, it also features a histogram as the graph's background, so you know where the lights and the darks live in your file. The light-dark gradients along the X and Y axes of the graph allow you to interpret the histogram and, with the curve in the graph, allow you to control how dark the darks are and how light the lights are.


Try it now. Imagine a point on the bottom – the X axis – that can be any value you choose. Picture a line going up from that point to the curve on the graph. then, from that intersection, imagine a horizontal line extending from there to the vertical gradient. The horizontal is the input from the image file itself, and the vertical is the result that the curve has on the output to display. Perforce, moving that curve will vary the output value for any range of input values (we use value here in its artistic context – the amount of light and dark).


To vary the amount of light and dark in any file, click on that little square handle on the curve and move it around. The results become immediately apparent. And, if you want to define white, black, and gray for the graphic, one simply chooses the proper eyedropper and then chooses the point on the graphic itself.


As EE's tutorial shows, you only have to play around with that one point to generate a great deal of change in your file. You can also add points with a mere click and then drag those around. Add a lot of points and you have yourself quite an adventure.


So if you use PS and you don't use Curves, you're missing out on a lot of artistic possibilities (not just powerful smart retouching on your images).


Learn Curves, live Curves, love Curves.


Tags: , , , ,


Powered by Qumana

03 January 2008

[art, photog] HDR Photography With A Downmarket Camera

1225. Well, it wasn't exactly downmarket when we got it, but it's more than a couple of years old.

Still, the Vivitar ViviCam 3705 typically accords itself with aplomb. When recently I heard of something called HDR (high dynamic range) photography and the astoundingly interesting images it captures, I wondered if I could attempt it.

Turns out I can. At its basis, HDR photography involves merging photos taking with varying EVs, or exposure values. While my understanding of EV isn't complete, the upshot I understand is the more negative the EV (at least on my camera) the shorter the exposure, the more positive, the longer the exposure. Naturally, the longer the exposure, the more overexposed and the more brightly toned the image; the shorter the exposure, the darker and more underexposed the snap will be.

To create an HDR image, one chooses a subject (not anything that's moving, of course; this is somethng that's akin to time-lapse, where the ideal subjects are landscapes and slow-at-most-moving objects) and takes a number of exposures of it at various EVs (this is known as bracketing.

My ViviCam doesn't allow much variation of the EV (from -1.8 to +1.8, variable in steps of 0.3 for some bizarre reason) but it allows enough to create the effect. Herein, the adventure:

I set up my old paper Dymaxion World globe on the studio counter, and snapped a picture at default settings (0.0 EV) to create a baseline for comparison. Here it is:
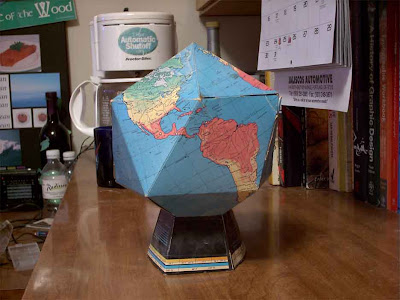

Very nice. Now, I took a series of five more pictures, bracketing it thusly: EV -1.8, -0.6, +0.6, and +1.8. I kept it symmetrical for reasons of simplicity, but when thinking about it I realized that there's probably no requirement to be absolutely symmetrical or all that wide. And here's the result:


Once again, click to embiggen. But even if you leave it small, you can see that the range of EVs available from the Mighty ViviCam 3705 is considerable.

The next step is to composite the images. If you have Photoshop CS2 and CS3, you're one of the lucky ones; the Merge to HDR option is available under the Automation submenu of the File dropdown or in Bridge CS3 under Tools>Photoshop>Merge to HDR.

The resulting image will be a 32-bit image with a luminance range far outside that supported by JPG/GIF files; you'll see that the "Save for Web and Devices..." choice in the Files dropdown is grayed-out. In order to post it to the web (if you should be so inclined, as I am), you'll need to convert to 16 or 8 bit bit depth. Here's how you do that:
  1. In Photoshop, do Image>Mode>, and select 16 or 8 bits (those choices are at the bottom of the menu)
  2. When you choose your bit depth, a dialog box will show up asking you if you want to merge the composite images. Do that thing.
  3. Choosing Merge brings up a dialog box that allows you to monkey with gamma, brighness, contrast, and all sorts of eye-glazing things. I just let the defaults rule in this case since this was my first time.
  4. After making these adjustments you get a preview dialog box that allows you to subtract and add images from the composite stack. After playing with that for a few minutes, I took the defaults for the same reason as before.
  5. The composite is rendered as a 16 or 8 bit graphic which can then be saved as a webilicious graphic.
At last, after all that process (and I do loves me the process) you're left with something like this:
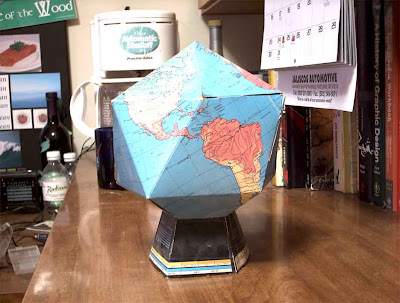

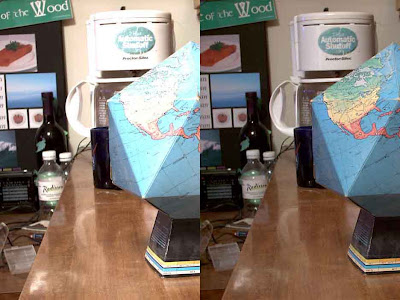
The differences are at once subtle and obvious. In the gestalt, there is a different, slightly otherworldy impression of space that causes the whole image to pop out. Shadows are still there but attenuated; highlights are even moreso. What has happened is the range of lights and shadows has been synthetically expanded by the bracketing we did.

The most impressive aspect of HDR is that way shadowed objects stay shadowed but at the same time come out of those shadows, giving the whole scene a sort of hardness and almost tactile feel on the vision. Compare and constrast, if you will:

I'm told that this is particularly effective with night shots and city landscapes. This we will have to try.

PS: I'm not being noble or adventurous by using an old camera; it's because I'm poor. I am still in the market for a patron. You could be that patron! Imagine how you will be celebrated as a visionary by helping me get to the next level!

Tags: , , ,

25 November 2007

[meme] ZehnKatzen's Weekly Winners #2: Sleepy State Street, Salem

1150. For this week's winner, I chose another photo of downtown Salem Oregon late on a Thanksgiving afternoon:

This is State Street, Salem, looking east from Liberty Street, approximately 3:15 PM, Thanksgiving 2007.

No, there aren't a bunch of invisible people there. Downtown Salem is that empty after hours and on holidays. Now, as I've said before, I'm very fond of my capital city. I grew up in Salem and was born just up the road in Silverton. Salem is in by blood and my background.

But it is a city of 150,000–but by this photo, you wouldn't know it. Practially everyone has, literally, gone home. The Lege is the biggest show in town, and that only happens once every two years.

That's Salem for you. Great place to be from.

Salem: Oregon's Tacoma.


Technorati Tags: ,,,,

07 November 2007

[pdx] The Old Tom Peterson's Bulding-Going, Going...

1095. Out and about on Tuesday afternoon. Dateline: SE 82nd Ave and Foster Road. View: End of An Era–Tom Peterson's old building is a-coming down:

As we understand it, the little LaRog's building hard by the corner is coming down next. We forget when they're winding things up there, however.

Ladmarks do have a way of changing. And change is a constant.


Technorati Tags: ,,,

30 October 2007

[pdx] Sunset From Rocky Butte

1068. We didn't have the tripod with us, but the stone parapet at Joseph Wood Hill park did fine duty:


A fine moment (about 18:30 today), captured in time.