
2287.A commenter in the missive, a few back, about creating the big-dot halftone
, further expanded on the notion of what an alpha channel is, and provides insight on how to better understand and use Photoshop masking technniques.
An alpha channel, as this artist understands it, is a separate informational channel, a companion to (If it's an RGB channel) the Red, Green, and Blue channels. It is not viewable – it is, however, used to store transparency information for the other channels.
"Storing selections" is one way of thinking of it. But, perhaps, a more catholic way of thinking about it is to think of alpha channels as masks. They are 8-bit channels, meaning each pixel can store one of 256 levels of gray, and can be worked on just like any other image. But the real power in the channel comes not so much from what you do to it, but what you do with it. Photoshop
If a Photoshop artist doesn't work with alpha channels much or is only now getting acquainted with them, the quickest way to get an introduction is to create Layer Masks with PS.
You probably know "layer masks" as those easy ways of combining two photos into one with an artistic transition, say a gradient or a whatever brush-or-eraser work you want to do, or custom brushes, or whatever. In my example here, I combine this image:
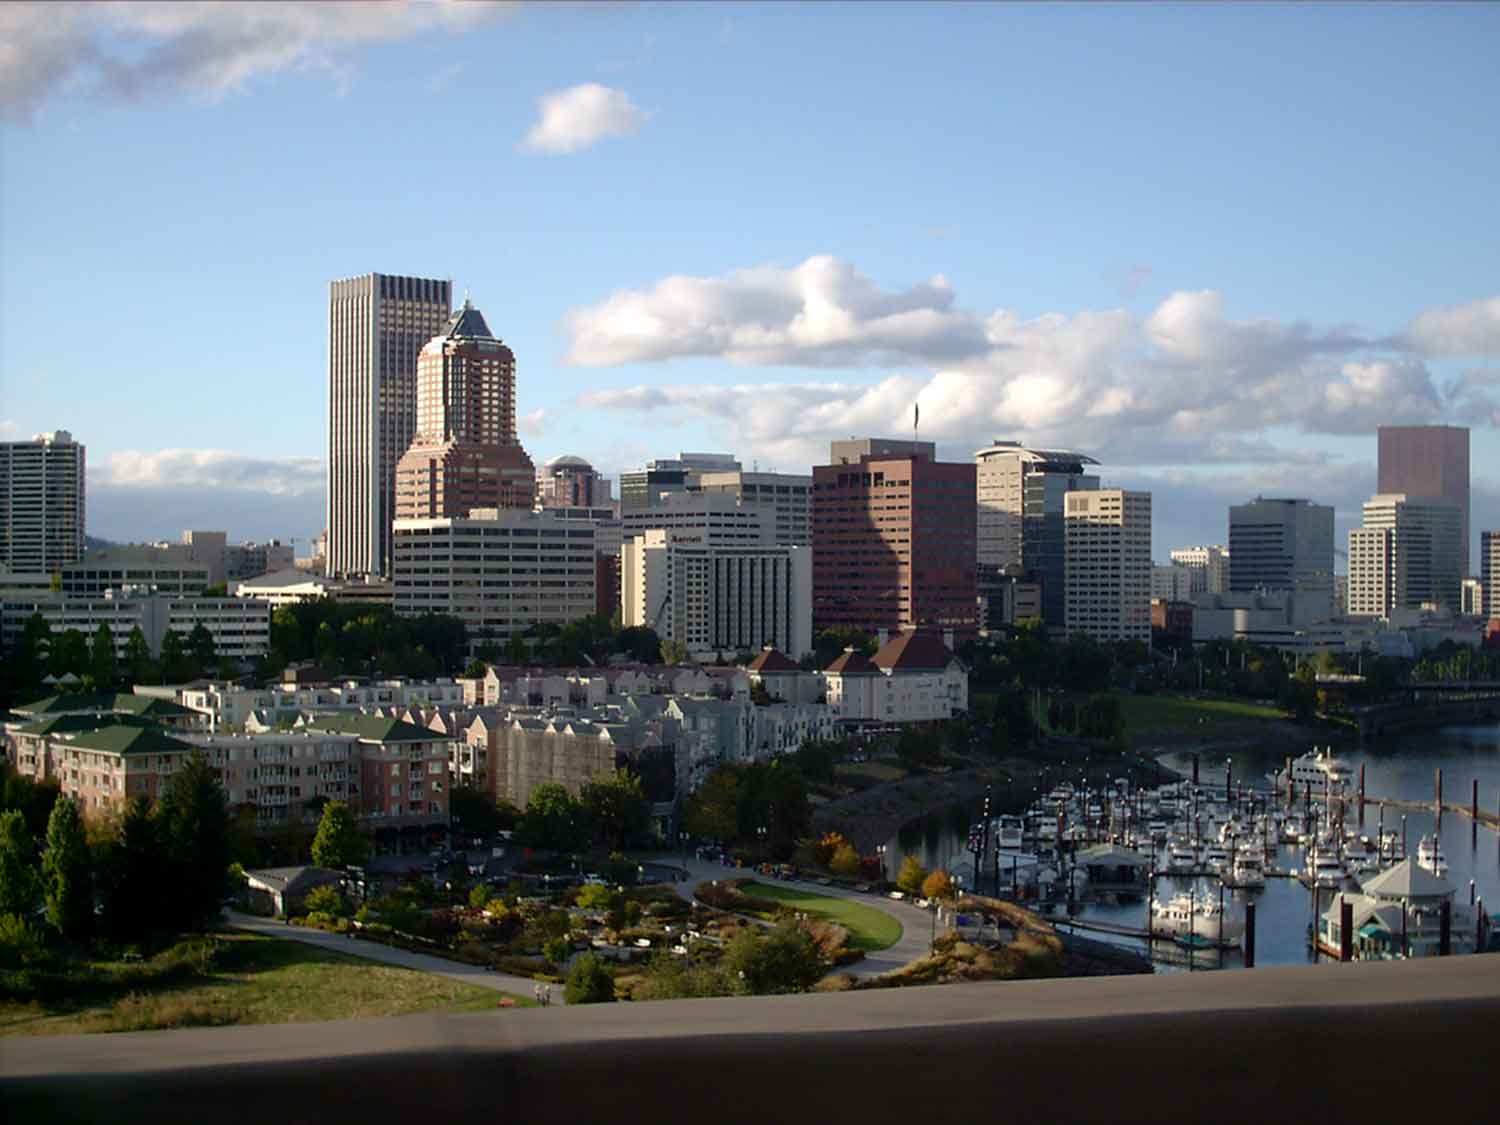
and this image:
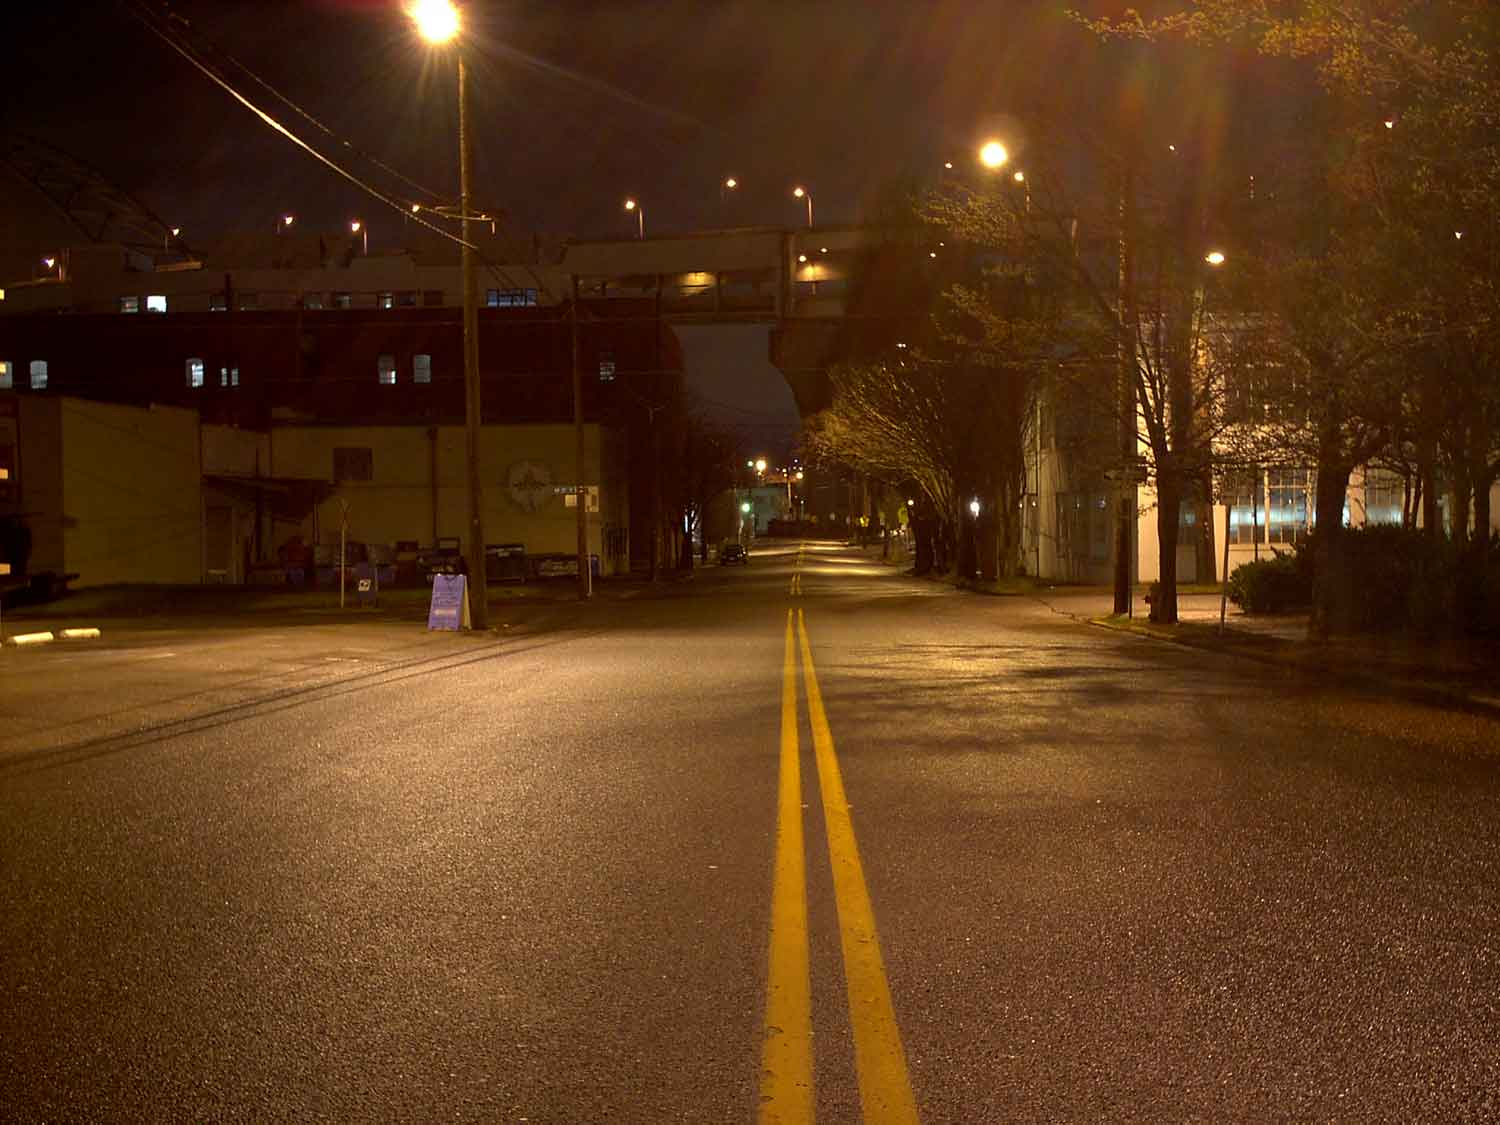
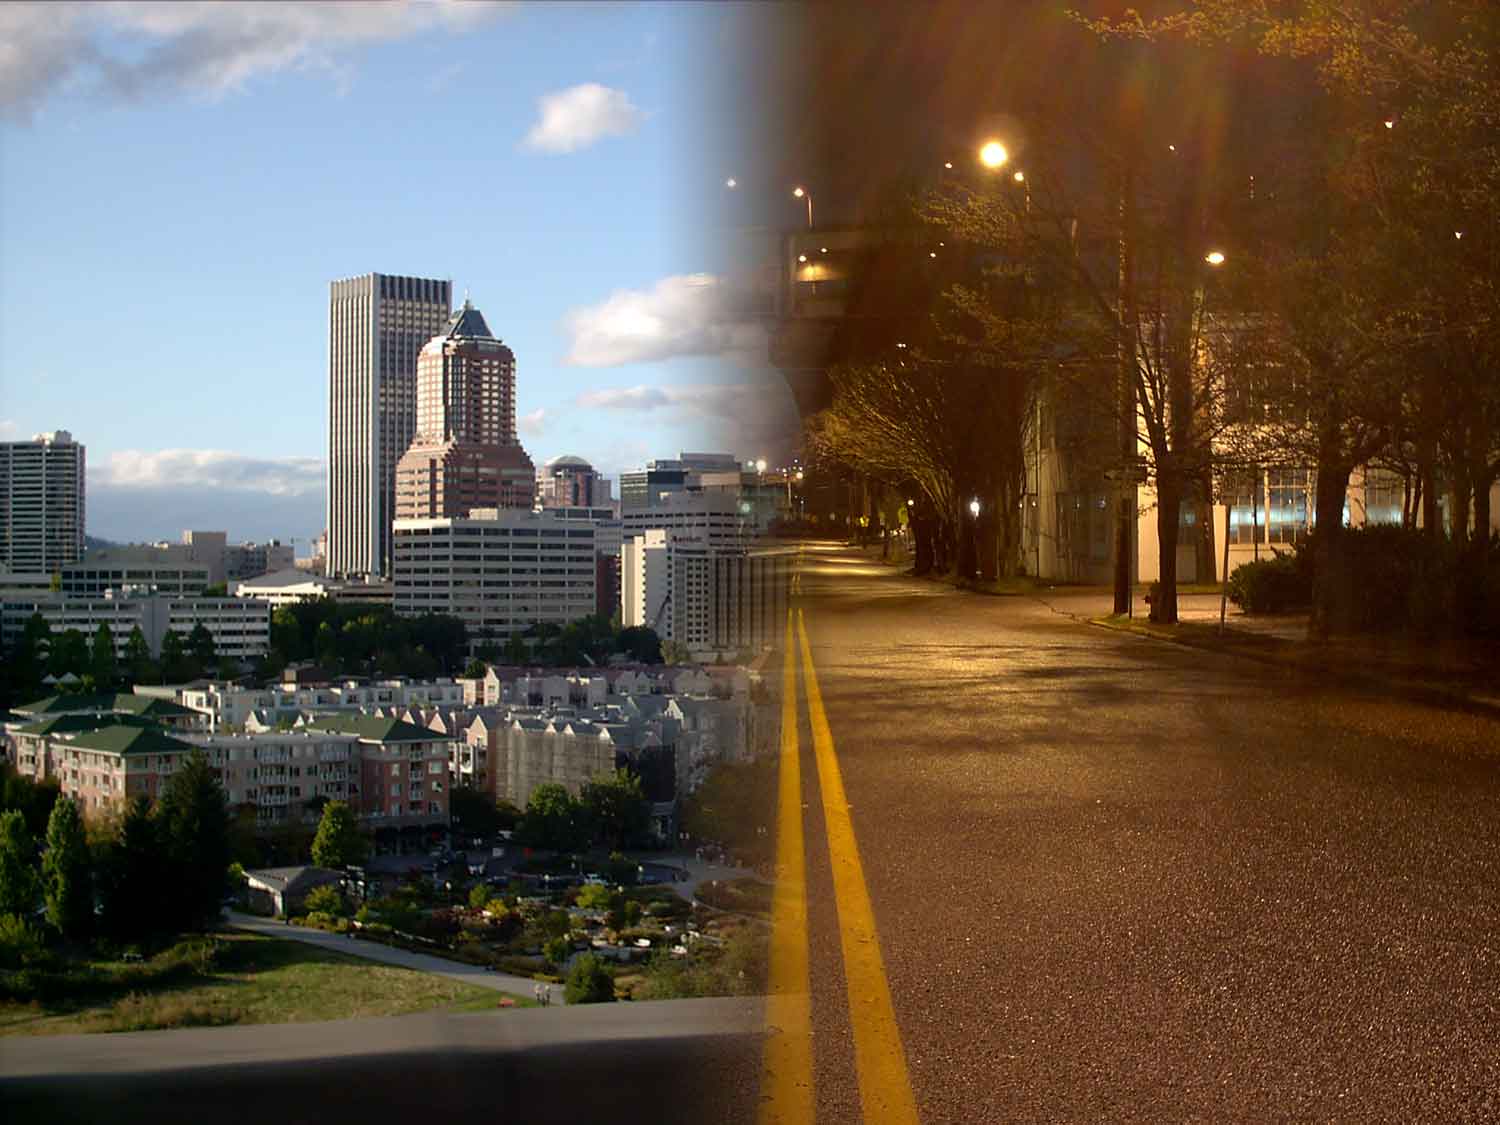
To create, say, this:
It's very quick for the Photoshop user, and it's implemented via alpha channels and the information they contain (the amount of gray determines how much of the image below shows up – you're not really destroying the image, but I get ahead of myself).
Layer Masks are enabled via the menu bar pulldowns Layers > Layer Mask > Reveal All/Hide All/Reveal Selection/Hide Selection. The differences between reveal and hide might be kind of obvious, but to define, if you have two images, one on each layer, the Reveal option will have the effect of letting you paint or change the top image to reveal the image below; the Hide option hides the top image and working the image you see causes the top image to show through. It all has to do how Photoshop interprets the alpha channel – which becomes the layer mask.
In the above two images, the city skyline sits on Layer 1 and the night scene sits on Layer 0:
Technorati Tags: Photoshop, Alpha Channels, Masks, Layer Masks
, further expanded on the notion of what an alpha channel is, and provides insight on how to better understand and use Photoshop masking technniques.
An alpha channel, as this artist understands it, is a separate informational channel, a companion to (If it's an RGB channel) the Red, Green, and Blue channels. It is not viewable – it is, however, used to store transparency information for the other channels.
"Storing selections" is one way of thinking of it. But, perhaps, a more catholic way of thinking about it is to think of alpha channels as masks. They are 8-bit channels, meaning each pixel can store one of 256 levels of gray, and can be worked on just like any other image. But the real power in the channel comes not so much from what you do to it, but what you do with it. Photoshop
If a Photoshop artist doesn't work with alpha channels much or is only now getting acquainted with them, the quickest way to get an introduction is to create Layer Masks with PS.
You probably know "layer masks" as those easy ways of combining two photos into one with an artistic transition, say a gradient or a whatever brush-or-eraser work you want to do, or custom brushes, or whatever. In my example here, I combine this image:
and this image:
To create, say, this:
It's very quick for the Photoshop user, and it's implemented via alpha channels and the information they contain (the amount of gray determines how much of the image below shows up – you're not really destroying the image, but I get ahead of myself).
Layer Masks are enabled via the menu bar pulldowns Layers > Layer Mask > Reveal All/Hide All/Reveal Selection/Hide Selection. The differences between reveal and hide might be kind of obvious, but to define, if you have two images, one on each layer, the Reveal option will have the effect of letting you paint or change the top image to reveal the image below; the Hide option hides the top image and working the image you see causes the top image to show through. It all has to do how Photoshop interprets the alpha channel – which becomes the layer mask.
In the above two images, the city skyline sits on Layer 1 and the night scene sits on Layer 0:
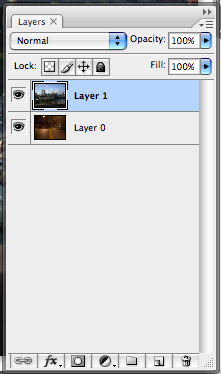
With Layer 1 selected, I go Layers > Layer Mask > Reveal All, and this is what I get:
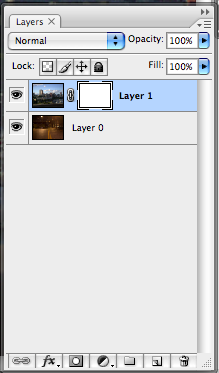
Note how a white rectangle, highlighted with corners and linked, has showed up in the Layers palette. This is your layer mask, and editing that layer mask will cause the image on Layer 0 to show through.
The white color is significant. If we look at the Channels palette, based on what we've found out about alpha channels, we begin to get an idea of why:
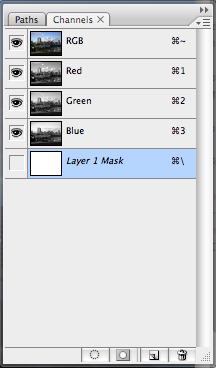
The layer mask is actually an alpha channel. It's solid whiteness tells Photoshop that the opacity of this mask is at a maximum, and if applied to a layer as a mask, it'll cause that layer to give maximum opacity. You'll see nothing through it – as long as you leave it alone.
If I go back to the layers palette, leave the layer mask highlighted, and do a foreground-to-background, linear gradient, this is what I get:
Note how a white rectangle, highlighted with corners and linked, has showed up in the Layers palette. This is your layer mask, and editing that layer mask will cause the image on Layer 0 to show through.
The white color is significant. If we look at the Channels palette, based on what we've found out about alpha channels, we begin to get an idea of why:
The layer mask is actually an alpha channel. It's solid whiteness tells Photoshop that the opacity of this mask is at a maximum, and if applied to a layer as a mask, it'll cause that layer to give maximum opacity. You'll see nothing through it – as long as you leave it alone.
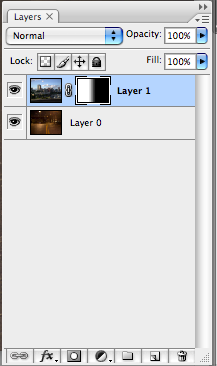
If I go back to the layers palette, leave the layer mask highlighted, and do a foreground-to-background, linear gradient, this is what I get:
See how the layer mask icon on Layer 1 has changed? By making a gradient, I've changed the alpha channel info:
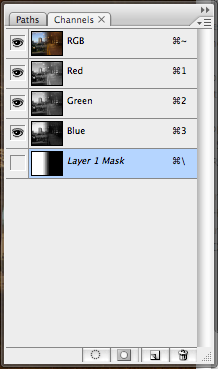
… which tells Photoshop how to interpret it as the mask which governs the opacity, giving me the half-reveal and the fuzzy transition in the middle which partially-obscures and partially-hides the lower layer – because that part was neither white (hide all) or black (reveall all) but gray (hide the lower layer to the degree that the mask is gray).
And that's not all. If you're sufficiently clever or if you want to operate directly on the mask, you can simply go to the channels panel and operate directly on the Layer 1 Mask channel.
And that's not all. If you're sufficiently clever or if you want to operate directly on the mask, you can simply go to the channels panel and operate directly on the Layer 1 Mask channel.
No comments:
Post a Comment