
 In this recent post, I went through the process of taking your Blogger template and self-customizing the link roll, and why I think it's important that, despite (or maybe because of) the availablility of tools that will do the job for you, that one should have some idea of how to code the links themselves.
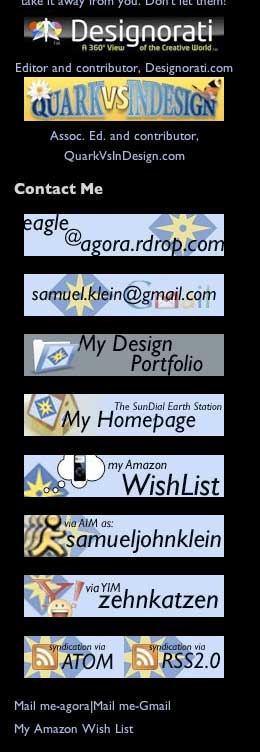
Note that my own Contact directory has sprouted images where the text links used to be. I had been satisfied with the text links for a long time but as a visual person I wasn't to be happy with them on a permanent basis. I also got a bit of a designing jones on and thought this was an apt outlet.
Note that, about all my contact link images, they are the same dimensions–200 px by 42 px. This was sheerly subjective, a dimension suggested by the width of the Designorati and QVI buttons above and arrived at by experiment; as it happened, a 200 pixel width seemed just right for the sidebar, and 42 pixels height just kind of happened–any coincidental parallels with Hitchhiker's Guide are just that.
Here's the way I got it done.
First: An Angle Of Attack
I approached this as a design challenge. Actually, I didn't sit down and say to myself, "Self, lets design up some buttons"; it was rather a sense of staleness that caused the idea to bubble up and from there it evolved. Once I got on the track of this, I asked and answered the questions of how I wanted it to look overall, what sort of 'attitude' the buttons would have, and as mentioned, such things as width and height.
I also decided I would keep to colors related to the colors in my logo. This, and the repetition of the logo in the buttons, contribute to a unity of theme and form which reinforce the story the buttons tell.
The font was a natural: the civilized being's font, Gill Sans. Repeating the font of the blog itself as well as the one in the head image, reinforces the design unity.
Second: Pictures Tell A Story
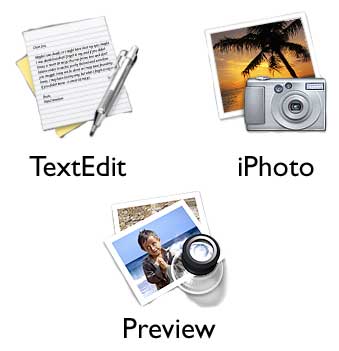 In the human interface design guidelines for Mac OS X, there is a paradigm touched on about "telling a story". Take, for example the icons for Preview (a photo with a loupe), iPhoto (a photo with a digital camera), and TextEdit (a stack of paper with a mechanical pencil). Each expresses not only what the app does but what you would use IRL to do it with. It's a very elegant paradigm that, in the typical Apple style, eloquently compels.
I didn't actually realize it at the the time, but this paradigm was probably informing what I was doing with the buttons. In all, my logo makes a background, supporting appearance–soft, but there.
In the agora email link, I felt the logo was all that was needed. The Gmail logo was added to the Gmail contact button, for an obvious reason. The logo got together with a file folder to make you think of a folder you can look in to find my designs and such; the homepage reference is obvious but I had fun with it; the Wish list, AIM, YIM, and newsfeed all carry it though. The images in the background support and lend punch and artistry to the message of the type without overwhelming it.
Third: Install the Dam' Image Already!
Okay, okay. Let's get started.
The key to getting an image in your HTML is the img tag. A typical, basic image tag looks like this:
<img src="http://host/path">
And that's really all it is. Tell the browser you have an image; tell it where to find it. The attribute src means "source", and points the browser to the...well, the source file.
There are a three additional attributes that the basic HTML coder should grok. These are:
- height: defines the number of pixels high that the graphic will occupy;
- width: defines the number of pixels wide that the graphic will occupy;
- alt: allows the coder to define a text string that will show up if the image doesn't load or if you mouse over it, and also for visually impaired websurfers who depend on accessability features.
<img src="http://www.foobar.com/images/email.jpg" width=200 height=42 alt="Mail Me at Agora">
This tag, when added to an HTML file which is loaded into the browser, will display the graphic. But we don't just want to display the graphic, we want to tie it to a link. Recall that the link
<a href="mailto:eagle@agora.rdrop.com">Mail Me at Agora</a>
Will result in the following:
Mail Me at Agora
All we have to do to make it a button is substitute the textual string with the img tag:
<a href="mailto:eagle@agora.rdrop.com"><img src="http://www.foobar.com/images/email.jpg" width=200 height=42 alt="Mail Me at Agora"></a>
Which should result in this display:

Which is much prettier. Man cannot live by type along (even if type is teh cool).
And here's a slick thing to do that will simplify your tag and improve your display: use your favorite photo editor to size the graphic to the size you want it to display. This way you can omit the width and height attributes and the image will display better–letting your browser size the image usually makes it look poorly.
Fourth: Where to Store The Piccies
Notice of course that to have images, one has to have them stored somewhere. You don't have to get yourself an image host to get this, though; the quick-and-dirty (but mad effective) way is to use Blogger itself–store the images in blog post drafts.
When you upload your graphics to Blogger, it gets stored on a server called photos1.blogger.com. Once uploaded, each graphic has a unique URL that can be copied and pasted. Images saved in a draft post are just as uploaded as ones in a published post. I have an armful of draft posts that contain nothing but images and discriptive titles to that I can find them easily. This drafts have become an online image library that I can take from at will.
To use your uploaded images, open the draft post, control-click (right-click) on the graphic and choose "Copy Image Location" from the contextual menu. Then, go to your HTML and paste in the copied URL into the src attribute of the img tag.
And there you have it: links with illumination. Much more visually exciting, and all you did was basic HTML, copying and pasting. There are a lot of details, but let them sink in, and you'll find that it really is quite simple.
Technorati Tags: Blogger, how-to, blogging, blog templates, HTML
No comments:
Post a Comment