
 I do work in Adobe Illustrator CS2, but it, as all Adobe graphics tools, are sprawling programs. Once one develops a style, one uses some features less than others, and I am no exception.
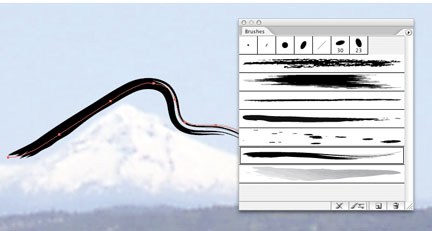
Just now, coming in on a situation, I was experimenting with brushes. Brushes take your vector path and apply a graphic look to it, which can be varied and changed, and there are effects already in Illustrator, such as a watercolor brush, ink splatter, and charcoal smear. But how to create your own?
With the "calligraphic" brushes and the "pattern" brushes, it's as simple as selecting "New Brush..." from the palette flyout menu or clicking the New Palette button on the bottom of the palette. When you do this with nothing selected, however, the "Art Brush" and "Scatter Brush" options are grayed-out. How to start those?
Simple, actually. The Art Brushes and Scatter Brushed require something to get started with, and that can be any vector path you already have, though the true power of this is to introduce painterly things into your Illustrator document, so if you really want to go to town, get yourself some crayon, watercolor mark, or such, and scan it. Place the scan into Illustrator to make of it a vector thing, then drag that thing onto the Brushes palette. The New dialog will pop up with Art, Scatter, and Pattern brushes selectable (and Calligraphic grayed-out this time). Select the brush type desired, then go to work on your options.
That's what I get for brushing up with "Illy".
LAYERS magazine has an excellent (and more complete) brush creation tute if you surf this link.
Technorati Tags: design, how-to, Adobe Illustrator, brushes
No comments:
Post a Comment