1237. Just today, Empty Easel posted a nifty, quick-n-dirty tute on how to use the Photoshop Curves tool, and it got me to thinking about it – not so much because the Curves tool is so wicked useful, but because some of the designers I've talked to about it pretty much swear by it. It's the one tool that every PS user gets to know and love. EE's tutorial gives you a good look at why. My Designorati colleague Jeremy Schultz also had an opinionated point on it a year or so ago.
Curves in Photoshop is allows you control of output of every single pixel in the image file, but that in and of itself still isn't the amazing part ... it's the hands-on, graphical approach that makes it possible for every Photoshop user, from the n00b to the l33t, to become a master photo retoucher. With Curves any PS user can render, in a flash, how bright the brights are and how dark the darks are and define darks and brights on a completely catholic basis for the whole image file.
What I find myself using PS a lot for is to take digital photos and giving them a little darkening and brightening for the purpose of bringing out detail (it's ironic that reality frequently doesn't live up to its own promises).

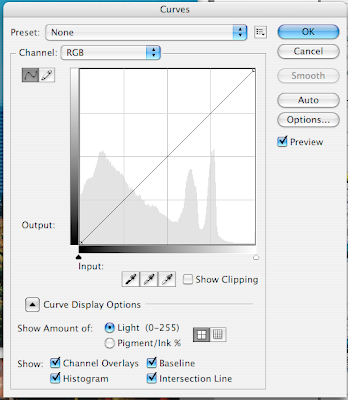
The genius of the Curves function is, as I've intimated, in the interface design. It's just a graph with a curve – a straight line at this point, but mathematically speaking, even a straight line is a curve. In this example taken from Adobe Photoshop CS3, it also features a histogram as the graph's background, so you know where the lights and the darks live in your file. The light-dark gradients along the X and Y axes of the graph allow you to interpret the histogram and, with the curve in the graph, allow you to control how dark the darks are and how light the lights are.
Try it now. Imagine a point on the bottom – the X axis – that can be any value you choose. Picture a line going up from that point to the curve on the graph. then, from that intersection, imagine a horizontal line extending from there to the vertical gradient. The horizontal is the input from the image file itself, and the vertical is the result that the curve has on the output to display. Perforce, moving that curve will vary the output value for any range of input values (we use value here in its artistic context – the amount of light and dark).
To vary the amount of light and dark in any file, click on that little square handle on the curve and move it around. The results become immediately apparent. And, if you want to define white, black, and gray for the graphic, one simply chooses the proper eyedropper and then chooses the point on the graphic itself.
As EE's tutorial shows, you only have to play around with that one point to generate a great deal of change in your file. You can also add points with a mere click and then drag those around. Add a lot of points and you have yourself quite an adventure.
So if you use PS and you don't use Curves, you're missing out on a lot of artistic possibilities (not just powerful smart retouching on your images).
Learn Curves, live Curves, love Curves.
Tags: Photoshop, Empty Easel, Designorati, Curves, Jeremy Schultz
Powered by Qumana

No comments:
Post a Comment